Captcha for MVC

I was working on a MVC4 project in my requirements – use captcha to validate the human vs Robots/spam.

I researched a lot to find the better solution and here are the things I came across that are better.

1) Visual Captcha – unique design which you never seen Demo
2) No Captcha Recaptcha by Google – Read more

Previously google had reCaptcha V1.0 which has some security threats. Their team really put some efforts on that gave us the better outcome out of it with API v2.0

Click here to see the implemetation/example on Visual Captcha.

I looked for ASP.NET MVC implementation for Google reCaptcha API 2.0, but couldn’t find any.

How to implement??

1) Lets create an API key pair for your site at https://www.google.com/recaptcha/intro/index.html and click on Get reCAPTCHA at top of the page and follow the below steps to create an application.

2) Once you have done with registration, the following keys will be generated
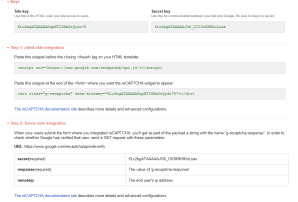
reCaptcha2Keys

Site key : used to display the widget in your page.
Secret key: used as communication between your site and Google to verify the user’s response whether the reCAPTCHA is valid or not.

3) As per google documentation we can display widget in 2 different ways.
a.Automatically render the widget
b.Explicitly render the widget

Display Widget

Your code in Index.cshtml view page will look like below
DisplayWidgetinView

4) Verify User’s Response
Once reCAPTCHA is generated and solved by a user, a field with g-recaptcha-response will be populated in the html. When ever user submit the form on your site, you can POST the parameter g-recaptcha-response to verify the user response. The following API url is used to verify the user response.

https://www.google.com/recaptcha/api/siteverify?secret=your_secret&response=response_string&remoteip=user_ip_address

In above API url the secret and response parameters are required and where as remoteip is optional. Here secret represents the Secret Key that was generated in the key pair and the repsonse is the g-recaptcha-response that was submitted during the form post. The following is the API JSON response object that we get once the response is submitted.

{
"success": true|false,
"error-codes": [...] // optional
}

Lets create an response class to verify the user response
public class UserResponse
{
[JsonProperty("success")]
public string Success { get; set; }

[JsonProperty("error-codes")]
public List Codes { get; set; }
}

We will create a POST method in Index action in the Accountcontroller to verify the user response.

[HttpPost]
public ActionResult Validate()
{
var response = Request["g-recaptcha-response"];
//secret that was generated in key value pair
const string secret = "6Lc2bgATAAAAAJG6_OII3tRKH6oLoax";

var client = new WebClient();
var reply =
client.DownloadString(
string.Format("https://www.google.com/recaptcha/api/siteverify?secret={0}&response={1}", secret, response));

var captchaResponse = JsonConvert.DeserializeObject(reply);

//when response is false check for the error message
if (!captchaResponse.Success)
{
if (captchaResponse.ErrorCodes.Count <= 0) return View(model);

var error = captchaResponse.ErrorCodes[0].ToLower();
switch (error)
{
case ("missing-input-secret"):
ModelState.AddModelError("","Missing User input secret"));
break;
case ("invalid-input-secret"):
ModelState.AddModelError("", "Invalid User input secret"));
break;
case ("missing-input-response"):
ModelState.AddModelError("", "Missing User input response");
break;
case ("invalid-input-response"):
ModelState.AddModelError("", "Invalid User input response");
break;
default:
ModelState.AddModelError("", "Error occured. Please try again");
break;
}
return View(model);
}
else
{ //For Valid
return RedirectToAction("Index", "Account");
}

If you coded right you will see something like below:

reCaptcha2Look

Hope it helps…….

An SPRequest object was not disposed before the end of this thread :SharePoint

I had a problem this morning – Not able to access SharePoint site. When I start debugging with ULS, I see below errors all over the place.

Problem:


—————————————————————————————————————
An SPRequest object was not disposed before the end of this thread.
To avoid wasting system resources, dispose of this object or its parent (such as an SPSite or SPWeb) as soon as you are done using it.
This object will now be disposed.
Allocation Id: {GUID} To determine where this object was allocated, set Microsoft.SharePoint.Administration.SPWebService.ContentService.CollectSPRequestAllocationCallStacks = true.
—————————————————————————————————————
System.AccessViolationException: Attempted to read or write protected memory. This is often an indication that other memory is corrupt.
at Microsoft.SharePoint.Portal.WebControls.LocStringIdLookupTable..cctor()
—————————————————————————————————————

Finding a way to resolve the issue:


If the sites are not working at this point of time, try doing App pool recycle or IIS reset(not recommended in peak hours as it recycles all App pools leading temporary outage).

To simply enable the stack trace below powershell can be used.

[System.Reflection.Assembly]::LoadWithPartialName("Microsoft.SharePoint")
$contentService = [Microsoft.SharePoint.Administration.SPWebService]::ContentService
$contentService.CollectSPRequestAllocationCallStacks = $true
$contentService.Update()

But, Microsoft suggested best practices should be used to dispose SPWeb and SPSite objects[Any SPRequests]. Most of the time these kind of issues could be because of Custom development.

To find out Any Dispose objects in your dll/exe file use SPDisposeCheck tool.

However installing SPDisposecheck tool is an add-on that can save your time and analyze your Visual Studio Code for non – disposed objects before code is deployed.

Here is a nice article – how to integrate SpDisposeCheck tool

Sharepoint Item Recycle vs Delete

If you delete a list item/document in SharePoint environment using the User Interface, it’s being moved to the Recycle Bin, so that it can be restored if necessary. There are situations when you want to include deleting list items and documents in your custom solutions. The most commonly used approach I have seen is calling the SPListItem.Delete() method. While this does the job, and deletes the item, deletes it permanently instead of moving to the Recycle Bin.

Looking carefully at the SPListItem class, you can find SPListItem.Recycle() method[not that popular]. Its description (Recycles the item and returns the item’s GUID.) is rather cryptic and doesn’t give you much clue on what you could use is for. It turns out that it’s exactly that method that you need to call in order to move a list item/document to the Recycle Bin instead of deleting it permanently.

In general moving items to the Recycle Bin instead of deleting them permanently is what you should do in your custom solutions. It is standard SharePoint behavior and therefore something end users will expect of your solutions as well. You should perform the permanent deletion only if explicitly named in the requirements. Otherwise, let’s just stick to what SharePoint does to leverage the same User Experience.

What is really goin’ on:
Internally there isn’t much difference between the SPListItem.Delete and SPListItem.Recycle methods. Both call an internal SPListItem.Delete method with a different parameter which determines whether an list item/document should be moved to the Recycle Bin or permanently deleted.

The following code shows how to remove all documents from a folder:

int iCount = spFolder.Files.Count;

for (int i = 0; i < iCount; i++)
{
spFolder.Files[i].Delete();
}

Deleting documents with this code will delete permanently without using the recycle bin.
To move the document to the recycle bin use the following code:
spFolder.Files[i].Recycle();

Different options to delete all items in a SharePoint list with PowerShell

Disclaimer :

There are several ways to do this – if you don’t need the list, just delete the whole list.

Option 1 :

If you have only small number of rows in a list go with this option.
If you need the structure of the list and just need to delete the items in the list, this script will do it, but there are faster methods out there so if you have 1000′s of items, know that this approach is kind of slow.
You might think (As I did) that once you had the list you could do something clever like:

$list.items.delete() #this fails


write-host "This will delete data, type YES to continue"
$retval = read-host
if ($retval -ne "YES")
{
write-host "exiting - you did not type yes" -foregroundcolor green
exit
}
write-host "continuing"

$web = get-spweb https://url to your web
$list = $web.lists | where {$_.title -eq “Name_of_your_list”}
Write-host “List $($list.title) has $($list.items.count) entries”
$items = $list.items
foreach ($item in $items)
{
Write-host ” Goodbye to $($item.id)” -foregroundcolor red
$list.getitembyid($Item.id).Delete()
}

You might also wonder why we getitembyID. You might wonder why we don’t just put $item.delete() inside the foreach loop – that fails too, so we get around that with the last line which seems to work.

Option 2:

Compared to the simple item by item delete with item.Delete() its 30 times faster; It works for SharePoint 2010 and should for 2013 (not tested).

param($weburl,$listname)
if ($weburl -eq $null -or $listname -eq $null)
{
write-host -foregroundcolor red "-weburl or -listname are null."
return
}

Add-PSSnapin Microsoft.SharePoint.Powershell -EA 0
$web = get-spweb $weburl
$list = $web.lists[$listname]

$stringbuilder = new-object System.Text.StringBuilder

try
{
$stringbuilder.Append(“”) > $null

$i=0

$spQuery = New-Object Microsoft.SharePoint.SPQuery
$spQuery.ViewFieldsOnly = $true

$items = $list.GetItems($spQuery);
$count = $items.Count

while ($i -le ($count-1))
{
write-host $i
$item = $items[$i]

$stringbuilder.AppendFormat(“”, $i) > $null
$stringbuilder.AppendFormat(“{0}”, $list.ID) > $null
$stringbuilder.AppendFormat(“{0}”, $item.Id) > $null
$stringbuilder.Append(“Delete”) > $null
$stringbuilder.Append(“”) > $null

$i++
}
$stringbuilder.Append(“”) > $null

$web.ProcessBatchData($stringbuilder.ToString()) > $null
}
catch
{
Write-Host -ForegroundColor Red $_.Exception.ToString()
}

write-host -ForegroundColor Green “done.”

Usage

Save above code as “DeleteItems.ps1”.
Create a batch file with below lines
@echo off
set “workingDir = %cd%”
powershell -Command “& {%cd%\DeleteItems.ps1 -weburl:your web url -listname:your list name -action:SD}” -NoExit
pause

Disclaimer

There is no way back – if you start the script there is no “ARE YOU SURE?” – all data is gone in a very short time.

The provided App differs from another App with the same version and product ID – While working with NAPA

Problem:
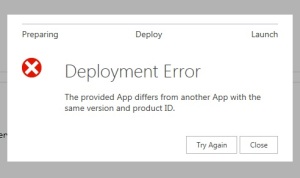
I’m currently developing a SharePoint 2013 Content App. After a few deployments via NAPA, I was suddenly confronted with the error “Deployment Error’: The provided App differs from another App with the same version and product ID”.
1
Solution:
But once the App is uploaded, SharePoint figures out that there still is an instance of the App. A first visual inspection of the SharePoint Developer site, indeed ‘My First Content App’ does not show up in ‘Site Contents’ overview.
2
If you keep getting the same error, SharePoint found an instance of the App in developer site.
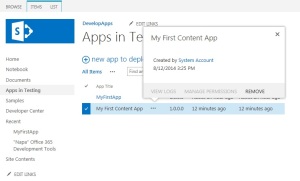
After some further investigation, it turns out that the application is still visible via the “Apps in Testing” library.
3
Remove the App from the library then you should be able to deploy it.
4
Hope it helps someone!!!

Minimizing the Console Window in C#

1. Introduction.

  • A few days ago, I was developing a console application written in C#.
  • One of the requirements of this application was that it must immediately minimize the console window on startup.
  • For the benefit of readers, I decided to post here the code for minimizing the console window of a managed application.

2. Example Code.

  • The code below demonstrates how this can be done :
  • using System;
    using System.Collections.Generic;
    using System.Linq;
    using System.Text;
    using System.Runtime.InteropServices;
    
    namespace CSConsole
    {
        class Program
        {
            const Int32 SW_MINIMIZE = 6;
    
            [DllImport("Kernel32.dll", CallingConvention = CallingConvention.StdCall, SetLastError = true)]
            private static extern IntPtr GetConsoleWindow();
    
            [DllImport("User32.dll", CallingConvention = CallingConvention.StdCall, SetLastError = true)]
            [return: MarshalAs(UnmanagedType.Bool)]
            private static extern bool ShowWindow([In] IntPtr hWnd, [In] Int32 nCmdShow);
    
            private static void MinimizeConsoleWindow()
            {
                IntPtr hWndConsole = GetConsoleWindow();
                ShowWindow(hWndConsole, SW_MINIMIZE);
            }
    
            static void Main(string[] args)
            {
                MinimizeConsoleWindow();
                Console.ReadKey();
            }
        }
    }
    
  • I basically used the GetConsoleWindow() Windows API to obtain the window handle used by the console associated with the calling process.
  • I then use the ShowWindow() API using the window handle returned from GetConsoleWindow() and with the second parameter set to SW_MINIMIZE (value 6) to minimize the console window.

Create Folders under document library: Nintex Workflow

I spent almost a day to figure this one out. Lot of people they might say folders are not good for SharePoint. In some cases they are right but not all the time. Lets take this business scenario when you dealing with SharePoint 2013 that to with Metadata navigation settings + Skydrive Pro sync process???

I know its kind of makes sense to go with folders at that point of time right……? Yes. Found a nice post by John Scott

Here I’m going through couple of ways to do it to make it happen.

1. SharePoint designer workflows

2. Nintex 365 workflows

For now I’m skipping “SharePoint designer workflows”, lets concentrate on “Nintex 365 workflows”.

Nintex 365 workflow to create folders in a document library:

There are 2 ways to accomplish our task. 1 cool thing about both the approaches is, first it will check for the folder with the specified name exists or not. If not it will try to create the folder. If folder already exists, it won’t delete or try to create, simple ignores the process.

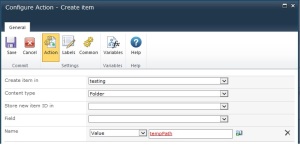
1. In NIntex workflows, we have an option called as – CREATE ITEM. So configure that accordingly if you are trying to create a top level folder.

Create Folder Nintex 2

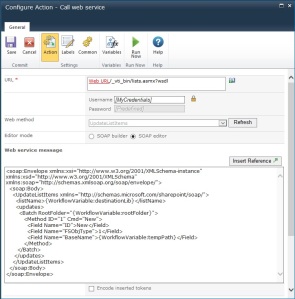
2. In Nintex workflows, we have an option called as – CALL WEB SERVICE. So configure that accordingly if you are trying to create a folder/sub folder. In the screenshot below, RootFoler attribute in ‘Batch’ is very important.

Create Folder Nintex 1

For example: If your library is XYZ and trying to create ‘Folder1’, below are the params to web service

  • destinationLib – XYZ
  • rootFolder – /XYZ
  • tempPath – Folder1

same way if you are trying to create a subfolder called ‘Folder1Level1’ under ‘Folder1’, below are the params to web service

  • destinationLib – XYZ
  • rootFolder – /XYZ/Folder1
  • tempPath – Folder1Level1

Hope it helps some of you folks……Happy WORKflowing……..

The SPPersistedObject, XXXXXXXXXXX, could not be updated because the current user is not a Farm Administrator

“The SPPersistedObject, Microsoft.SharePoint.Administration.SPJobDefinition, could not be updated because the current user is not a Farm Administrator”.

Since we were running the SPJobDefinition.Update() and related code under SPSecurity.RunWithElevatedPrivileges() I was under the impression that the code already ran as Farm Admin.
After some more tracing through the code I found a property in SharePoint API which controls this behavior:
Microsoft.SharePoint.Administration.SPWebService.ContentService.RemoteAdministratorAccessDenied
After setting this property from PowerShell the issue went away with no code changes.

function Set-RemoteAdministratorAccessDenied-False()
{
# load sharepoint api libs
[System.Reflection.Assembly]::LoadWithPartialName("Microsoft.SharePoint") > $null
[System.Reflection.Assembly]::LoadWithPartialName("Microsoft.SharePoint.Administration") > $null
# get content web service
$contentService = [Microsoft.SharePoint.Administration.SPWebService]::ContentService
# turn off remote administration security
$contentService.RemoteAdministratorAccessDenied = $false
# update the web service
$contentService.Update()
}
Set-RemoteAdministratorAccessDenied-False

Below steps to be followed to make it work.

  • Save above code as a ps1 file
  • After running above script as a administrator in powershell make sure to give an

    iisreset

Hope it helps some of your problems.

Access Propert Bag in Sharepoint

There are multiple ways to access Property bag settings. As discussed in my previous post deploy appropriate property bag solution onto your farm to deal with UI version.

3 ways to access Property bag settings:

  • UI Version
  • SharePoint Designer
  • Programatically
  • UI Version:

    Using SharePoint Designer

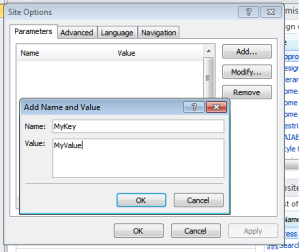
    (i). Open the site in SP Designer 2010 and click on Site Options.
    (ii). Under Parameters, click on Add and Start Adding Key/Value PairsDesigner1

    Programatically

    To read this MyKey value, just use the below code.

    SPSite siteCollection = new SPSite("https://jagadeesh4sp.wordpress.com");
    SPWeb website = mySite.RootWeb;
    string MyValue = website.AllProperties["MyKey"]);
    

    Use the below code to set the property bags Programatically

    SPSite siteCollection = new SPSite("https://jagadeesh4sp.wordpress.com");
    SPWeb website = mySite.RootWeb;
    website.Properties.Add("MyKey", "MyValue");
    website.Properties.Update
    

    – Property bag Extension class

    public static class PropertyBagExtension
    {
     
        public static void AddProperty(this SPWeb web, string key, string value)
        {
            web.AllowUnsafeUpdates = true;
            web.Properties[key] = value;
            web.AllProperties[key] = value;
            web.Update();
            web.Properties.Update();
        }
     
     
        public static void RemoveProperty(this SPWeb web, string key)
        {
            web.AllowUnsafeUpdates = true;
            web.AllProperties.Remove(key);
            web.Properties[key] = null;
            web.Update();
            web.Properties.Update();
        }
     
     
        public static string GetPropertyValue(this SPWeb web, string key)
        {
            if (web.AllProperties.ContainsKey(key))
                return web.AllProperties[key].ToString();
     
            return null;
        }
    }
    

    Hope it helps some of you folks……

    Property Bags for SharePoint

    Property Bags enables the developers to add properties to the SharePoint objects like

    a. Farm (SPFarm class)
    b. Web application (SPWebApplication class)
    c. Site collection (SPSite class)
    d. Site (SPWeb class)
    e. List (SPList class)

    Using Property Bags, developers can avoid storing Key/Value pairs in Web.Config or at some other location. Internally, Property bags are implemented as a hash table of property names and values.

    We can set the Property Bag values using two ways:
    a.CodePlex Solution for MOSS 2007
    MOSS2007
    b.CodePlex Solution for SP 2010
    SP2010
    c.CodePlex Solution for SP 2013
    SP2013

    Brief Description

    SharePoint Property Bag offers developers to store configurations settings at different levels of the SharePoint hierarchy outside of the application itself.

    Features

    1. The SharePoint Property Bag Settings includes a hierarchical configuration manager that can safely store and retrieve configuration settings at the following levels:

    *Farm (SPFarm class)
    *Web application (SPWebApplication class)
    *Site collection (SPSite class)
    *Site (SPWeb class)
    *List (SPList class)
    2. Import and Export Property bags
    3. Access Property bags from Central Administration or Site Settings
    4. Encrypting property bag value

    Related Resources

    The Configuration Manager
    Managing Custom Configuration Options for a SharePoint Application